Blog Posts
Chaining OAuth - Delegating Authentication but Adding Authorization
OAuth, with or without OpenID Connect, is a great way to delegate login to another identify provider. You've seen this many times - web sites that say login with Google or with Facebook. In our setting at ETH Zurich, this is often Switch, Switzerland's academic community AAI provider. But what if you don't want all users with a Google/Facebook/Switch/... account to access your site? And/or you want to add specific authorization levels to your users. Read on.
OAuth and OpenID Connect
First of all, let's look at OAuth (by the way, we mean OAuth2 - no-one talks about OAuth1 any more).
Imagine you want a user to log in with their Google account. You could prompt the user for his or her username and password and then call the Google login endpoint with those credentials. But would your users want to trust you with their username and password? Probably not, and Google doesn't either so it doesn't allow this method of authentication anyway.
OAuth solves this issue by ensuring it is Google, not your app, that asks for the user's credentials. The user gets redirected to Google's login page. They can see this in the URL. After successfully logging in, Gooogle issues your app with an access token that can be used to access whatever features of their account they authorized your site to access. That's OAuth (well, one variety of OAuth called the Authentication Code Flow).
Google can also issue another token called an ID Token. This token contains information about the user - username, real name, email address, etc. It is signed by Google so you know it is authentic and you can use it to identify the user. If you get one, the user is legit. If not, the user failed the login. That's OpenID Connect.
Jave Web Tokens (JWTs)
So Google, Switch etc, issue you a pair of tokens (actually three but we will come to that). How do you use these tokens and verify they are legitimate.
The most popular token format today is Java Web Tokens or JWTs. The nice thing with JWTs is your application vcan verify they are authentic without having to call any endpoints at site that issued it.
A JWT has three parts, separated by dots. The first part is a JSON string whcih contains metadata about the token, specifically an identifier and the algorithm it is signed by. This string is Base64Url encoded.
The second part is also a JSON. It contains information about the user and/or token (called claims), also Base64Url-encoded. An example is
{
    "aud": "IDENTIFIER",
    "iss": "IDENTIFIER",
    "sub": "USERID"
}
The third part is a digital signature of the first two parts, signed using the algorithm identified in the first part. You can put whatever claims you like in the middle section but some have special meanings. aud identifies who the token is for, typically the site where it is used to access resources in the case of an access token or a client identifier for an ID token. iss is the base URL of the issuer of the token and sub is a user identifier at the issuer site (eg userid or username).
An app wishing to validate the token needs the key to validate the signature. If it is a public key, OpenID Connect defines a URL where this can be fetched from.
A client wanting to know whether someone successfull logged in and, if so, who it is, needs to validate the signature then decode the JSON string.
If the client wants to access a resource as that user, it passes the access token as an Authorization: Bearer HTTP header.
Authorization Code Flow
How does a client request an access token or ID token. For interactive applications, where the agent (browser) can redirect users to a login page, the client uses the variant of OAuth called the Authorization Code FLow.
This is illustrated below.
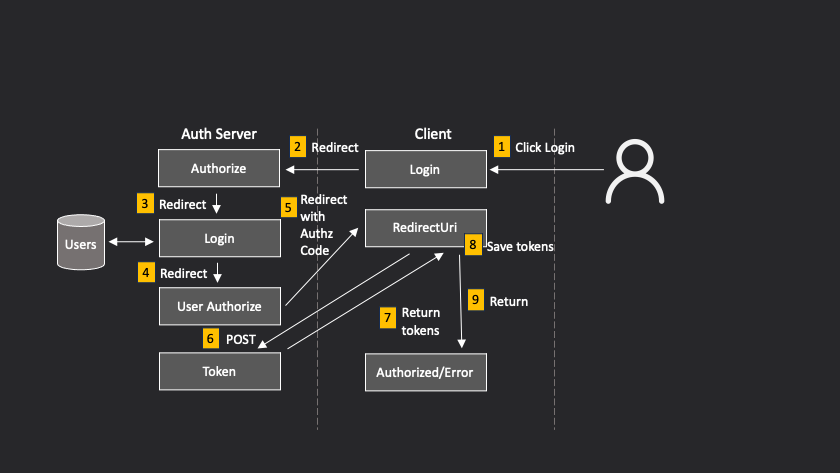
The steps are:
- User clicks on some login button
- Your client redirects user to authentication server (eg Google, Switch) authorization page
- Authorization server checks if user is logged in and, if not, redirects him or her to its login page
- If this is the first time the user has logged into this account through your application, authorization server will ask user if they want to grant it access.
- Authoriation server redirects browser to a special URL at your application, known as the Redirect URI and has to have been pre-registered with the authorization server, passing a temporary authorization code as a GET parameter
- Your Redirect Uri handler makes a POST request to the authorization server to obtain the tokens, passing the authorization code it was given to validate its credentials
- Authorization server responds with the tokens
- Here is where it gets implementation-specific on your clients side. The way I do this is to store the tokens in the backend, associated with the user's session. There are alternatives - see my post on storing OAuth tokens.
- Your backend sends as its response either a cvonfirmation that login was successful, or an error
Why so complicated? Because we want the authorization server, not our application, to ask for the user's credentials. The only way this canb happen is with an HTTP redirect. HTTP redirect is only possible as a GET request. Yes we should not request nor receive secrets with a GET, not make state changes. Therefore OAuth works by issuing a temporary code with the GET request and requiring a POST to exchange this for the actual tokens.
Chaining OAuth
Now what happens if we don't want all users with an account at that authorization server to log into our application? Or we want to add additional authorizations (in the form of claims in the JWT). We cannot edit the JWT as only the authorization server can sign it. We need to have our own server that acts as an authorization server to the client but as a client to the authorization server where the account resides (Switch, Google, etc).
When it receives the tokens, it validates them and decodes the JWT. It looks up the user in its own database. If that user is not authorized, it responds with Access Denied. If the user is authorized, it adds adds its own claims to the JSON and creates a new JWT from that, signed with its own secret key. That is what it passes back to the client. Here's now it looks.
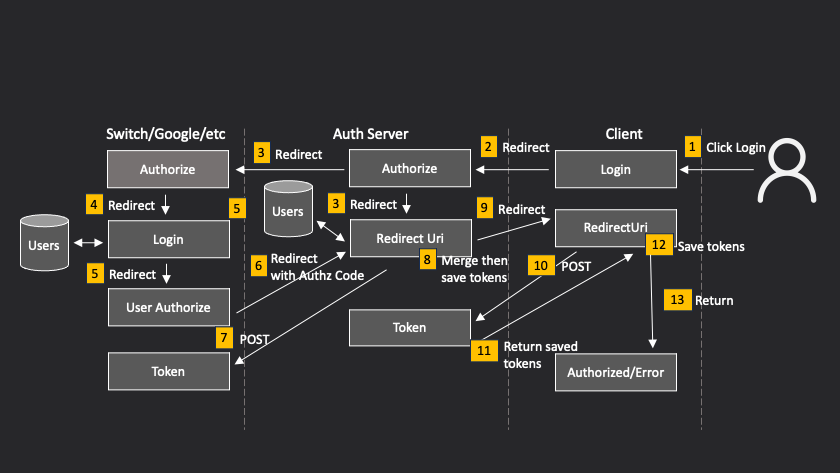
The steps are:
- User clicks on some login button
- Your client redirects user to your authentication server's authorization page
- Your authorization server redirects again to the authorization server with the user's account (Switch, Google, etc)
- As before, that authorization server asks the user to log in
- As before. that authorization server asks the user to authorize your app
- Authoriation server redirects browser to your authorization server's Redirect Uri. This is the one that was registered with the authorization server, not your client's Redirect Uri.
- Your authorization server's Redirect Uri handler makes a POST request to the authorization server to obtain the tokens, passing the authorization code it was given to validate its credentials
- When it receives the tokens, your authorization server extracts the username from the JWT and looks that user up in its own database. If the user is not authorized or not in the database, the Redirect Uri responds with an OAUth Access Denied error code. If the user does exist, it adds its own claims to the JSON it extracted from the JWT and creates a new access token and new ID token, signed with its own key, and with the issuer as itself, not Switch/Google.
- Your authorization server creates an authorization code and stores the new tokens associated with this authorization code. It redirects to your client's Redirect Uri (which must be pre-registered with it), with the newly-created authorization code.
- The client's Redirect Uri makes a POST request to your authorizatiion server, following the standard Authorization Code Flow protocol.
- Your authorization server looks up the tokens associated with the passed authorization code. If they exist, it passes them back as the response. Otherwise it returns with the standard OAuth Access Denied error.
- As before, the client backend saves the tokens, associating them with the user's session (or sends them back to the client, depending on your implementation)
- The user response is either a success page or an error. as before.
Why so convoluted? Because, by implementing it this way, the client is still just a regular OAuth Authorization Code Flow client. It doesn't have to know the authorization has been chained. In fact, you can have more than two stages in this chain. The client just has to know about the first. This means you have a regular OAuth authorization server than any OAuth-enabled client can access, and your client can also be configured to access any other OAuth authorization server.
Refresh Tokens
OAuth access tokens are designed to be short-lived. So that the user doesn't have to constantly obtain new access tokens, OAuth defines a Refresh Token Flow and issues the client with a refresh token as well as the access token and ID token. The refresh token can thus be exchanged for a new access token without user intervention (or even the user being aware). Your server can also revoke the refresh token if necessary and thereby fail to issue a new access token when the old one expires.
When we do this OAuth chaining, we don't have to issue our own refresh token. We can pass the Switch/Google one straight through as it is the entity that will be reissuing access tokens. We just make sure our own tokens have the same expiry time.
Issuers and Audience
Your client receives up to 3 tokens, each with its issuer and audience. They are:
- Your access token: issuer is your authorization server, audience is whatever consumes your access tokens (in OAuth-speak, this is your resource server)
- Your ID token: issuer is your authorization server, audience is your client
- Refresh token: you do not create your own. You pass the Switch/Google refresh token through, which has an issuer of Switch/Google and an audience of your client
Implementation
I have this working in the Sveltekit version of Crossauth. Fastify version to follow soon.